Article resources
Most of the time, when your Task Manager displays a 100% disk usage, it’s caused by overworking of your hard drive. And not just that – the computer becomes slow and very difficult to work on.
The truth is – this problem occurs all by itself. So, if you were wondering if you did something to cause this, you probably didn’t.
Luckily, this issue is fairly easy to fix.
In this article, we’ll present you with 8 possible solutions for the 100% disk usage issue. These have all been said to work by some users. Of course, some may not work for you. So, just move through steps and find which one actually solves your issue. There’s no need to try all of them.
1. Disable Windows Search Temporarily or Permanently
Windows Search is a handy tool that helps you easily find files and programs on your computer. However, indexing of all the files builds up your disk usage quite a lot.
That may be the only thing that’s causing the issue. So, you should try disabling the Windows Search temporarily and see if the problem is gone. If that’s the case, you can also choose to disable it permanently.
Even after you do so, you will still be able to use the search, but it will take a bit longer.
Besides that, you can try using another search engine instead of the Windows one.
How to Disable Windows Search Temporarily
A quick note: when you disable the search temporarily and then restart your computer, the Windows Search will return.
Having said that, let’s go to the steps:
1) Press the Windows key and X simultaneously on the keyboard.
2) Choose Command Prompt (Admin) from the list.
3) You’ll receive a question from the User Account Control asking you if you want the program to make changes to your PC. Select ‘Yes.’
4) Then the black Command Prompt window will open up. Type in this command: net.exe stop “Windows search” and press Enter on your keyboard.
Now check the Task Manager for disk usage. If it’s still very high, that means that the Windows Search didn’t work. You can move on to the next solution.
If the disk usage is low, however, then you should permanently disable the search.
How to Disable Windows Search Permanently
Here’s how to do it:
1) Press the Windows key and R on your keyboard simultaneously.
2) After the ‘Run’ box has popped up, type services.msc in it.
3) Find ‘Windows Search,’ double-click on it and choose Properties.
4) Set the Startup type to ‘Disabled.’ Then select Apply and OK to confirm the changes.
Open the Task Manager, go to the Processes tab and check the disk usage again. If the percentage isn’t 100 anymore, consider the problem fixed.
And of course, if the disk usage is still 100%, move on to solution number 2.
2. Update the Device Drivers
Device drives can also be the cause of the 100% disk usage problem. The best way to solve this issue is to update the drivers.
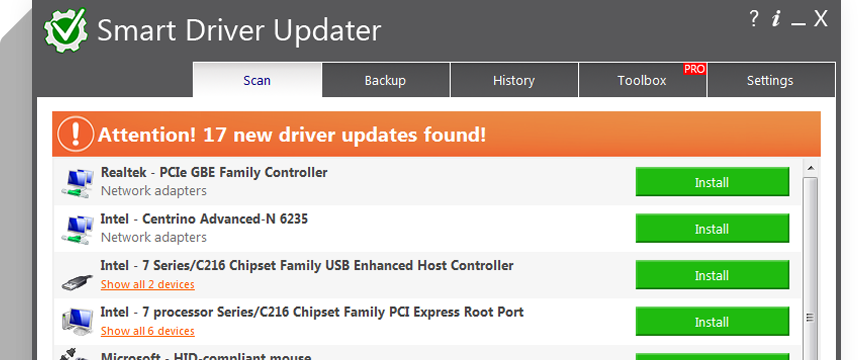
Surely the easiest way to do this is by using Driver Easy. This program will automatically update the right drivers for your computer.
It’s easy to operate, and you basically don’t have to do anything. That way you don’t have to worry about making any crucial mistakes with the installation.
1) Download Driver Easy and install it.
2) Run the program and click on Scan Now. Then the program will scan for any problematic drivers.
3) After the scan, you’ll see a list of drivers which you should update.
4) Click on Update option next to the driver. Do so for each and every one. If you have the Pro version, you can select the Update All option.
And finally, check the disk usage in the Processes tab in Task Manager again. If the percentage is below 100, you have solved the issue.
In case the problem still persists, you should move on to our next suggested solution.
3. Disable SuperFetch
SuperFetch is a Windows 8 and higher feature that helps you load important programs faster. It caches data which makes apps more available for whenever you want to use them. Although this sounds helpful, SuperFetch sometimes causes performance issues such as this one, 100% disk usage.
Here’s how to stop it:
1) Press the Windows key and X at the same time on the keyboard.
2) Choose Command Prompt (Admin) from the list.
3) You’ll receive a question from the User Account Control asking you if you want the program to make changes to your PC. Select ‘Yes.’
4) Then the black Command Prompt window will open up. Type in the command net.exe stop superfetch, and press Enter on the keyboard.
Now, wait a couple of minutes to see whether your PC’s performance has improved. Open the Task manager once again and go to Processes tab to check the disk usage. If it’s below 100%, you have most likely solved the issue.
If this, however, did not resolve the issue, please go to our next solution below.
4. Do a Disk Check
1) Press the Windows key and X simultaneously on the keyboard.
2) Choose Command Prompt (Admin) from the list.
3) You’ll receive a question from the User Account Control asking you if you want the program to make changes to your PC. Select ‘Yes.’
4) Then the black Command Prompt window will open up. Type in the command chkdsk.exe /f /r and press Enter on the keyboard.
5) After that, press ‘Y.’ This command will make sure that your computer does a disk check every time it restarts. Don’t forget to check if you have closed all the apps before restarting.
Note: Disk checks occur every time you reboot your PC. Besides that, they can take a while (sometimes up to a day), so you can skip it if you do not have time at that particular moment. But make sure that you reschedule it.
And once again, open the Task Manager and check the disk usage in the Processes tab. If it’s below 100%, you’ve successfully fixed the issue.
In case this did not fix the issue, and disk usage is still 100%, move on to the next solution.
5. Reset Virtual Memory
Virtual Memory, to put it simply, is just your computer’s additional memory. It uses both your RAM and hard drive memory. So, when your computer runs out of RAM, and you have no space left, it starts storing files in the virtual memory instead, swapping to RAM sometimes, too.
Maybe it’s causing the disk usage issue, so you should try resetting it. Here’s how to do so:
1) Press Windows key and Pause or Break key on your keyboard at the same time.
2) Find and choose the option Advanced System Settings from the left panel.
3) Click on the Advanced tab, then on Settings.
4) Again, click on the Advanced tab and in the Virtual Memory section, choose the Change option.
5) Make sure that the box next to the ‘Automatically manage paging file size for all drives’ option is not checked.
6) Choose your Windows drive (for most computers it’s C:). Then you can set the preferred Initial size and Maximum size for your Virtual Memory.
Initial size usually depends on your computer. In case you can’t decide which value to input, just use the Recommended option.
And when it comes to Maximum size, make sure not to set this value too high. The recommended value is 1.5 times the size of your RAM.
After you’ve typed in the virtual memory size, click on Set, then OK to confirm.
7) Now you should clean your PC’s ‘temp’ files. Do this by pressing the Windows key and R simultaneously. Then after the Run box has popped-up, type in temp and press Enter.
8) A folder with ‘temp’ files will open. Select all of these files and Delete them.
Then, of course, check the disk usage in the Task Manager Processes tab to see whether this method fixed the issue.
If the disk usage is still high or 100%, you should move on to our next solution.
6. Disable Your Antivirus Temporarily
You probably already have antivirus software installed on your computer, whether it’s Avast, Kaspersky, AVG, or some other software. And sometimes, these can cause the disk usage to go up to 100%. To see if this is the case, you should try disabling the antivirus.
Every antivirus program has its own settings, so if you’re unsure how to turn it off, go to their official website’s FAQ or Help section to find out how to do this.
As you probably know, Windows 10 already has its own built-in antivirus software – Windows Defender. So, if you have an additional antivirus program, you don’t have to worry about safety since Windows Defender is there anyway.
After you’ve disabled your antivirus software, go to the Task Manager and check the disk usage again in the Processes tab. If it’s not 100% anymore, you have probably solved the issue.
If the disk usage is still 100%, try our next solution.
7. Change Chrome and Skype Settings
There’s also a possibility that a certain combo of Google Chrome and Skype settings creates the 100% disk usage problem.
The following are steps to alter these settings in order to fix your problem:
1) Open Google Chrome, then click on the three dots in the top right. Select Settings.
2) Go to the very bottom of the Settings to find the Advanced option and click on it.
3) Find Privacy and Security. ‘Use a prediction service to load pages more quickly’ option should be switched off.
4) Ensure that Skype isn’t currently running on your PC.
5) Open Windows Explorer and go to the directory C:\Program Files (x86)\Skype\Phone\.
6) Find Skype.exe, right-click on it and select Properties.
7) In the Security tab, click on Edit.
8) Select ALL APPLICATION PACKAGES and check the Allow box for the Write permission. Then click on Apply and OK.
And once again, open the Task Manager, go to the Processes tab and check the disk usage. If it’s below 100%, you’ve successfully fixed the issue.
In case this did not fix the issue, and disk usage is still 100%, move on to the next solution.
8. Fix the StorAHCI.sys Driver
The cause of the 100% disk usage problem can also be a bug with Advanced Host Controller Interface PCI-Express (AHCI PCIe) models, StorAHCI.sys driver, to be more exact.
To see whether this is what caused your issue and possibly solve it, follow these steps:
1) Press the Windows key and X at the same time on your keyboard, then choose Device Manager from the list.
2) Scroll down to find the IDE ATA/ATAPI Controllers category and expand it. Double-click on AHCI controller.
3) In the Driver tab, go to Driver Details. If there is a StorAHCI.sys (or storahci.sys) file path in there, that means your computer is running the inbox AHCI driver. That is what’s causing the 100% disk usage, and you should move on to the next step.
If you do not see the StorAHCI.sys file, then it’s not running, and that’s not the issue.
4) Close Driver Details and choose the Details tab instead of Driver. From the Property menu, choose Device Instance Path. Note down the controller name below because you’ll need it later. It usually starts with VEN_.
5) Now type regedit in the Windows Search and press Enter.
6) Once the Registry Editor has opened, type this in:
HKEY_LOCAL_MACHINE\System\CurrentControlSet\Enum\PCI\
* The ‘xxxxx’ stands for the controller name that you noted in step 4.
** Random number is different for every computer.
7) Double-click on MSISupported. Change the Value data to 0.
8) Reboot your PC.
And lastly, go to the Task Manager and check the disk usage again in the Processes tab. If it’s not 100% anymore, you have most likely solved the issue.